Microsoft Windows 8, 8.1, 10 or 11
Making room for Feren OS
Hint
“Free space” is not being used in the terminology you might think of here - instead it refers to a partition-less area of your hard drive disk where you can add a partition, or expand an existing partition, into.
To start off, go into Start and search for “compmgmt.msc”. You should then get a result called either “Computer Management” or “compmgmt.msc” - right-click on it and select Run as Administrator in the menu that appears.
In Computer Management, look on the left, under Storage, and click on the item called Disk Management.
Now you’re in Disk Management you’ll see a bunch of lettered drives listed on the bottom-center - “(C:)” usually represents your Microsoft Windows installation’s partition, although not always - go to and check which drive has the Microsoft Windows logo on it to identify the partition.
Hint
“Partition” refers to an allocated amount of a disk, such as your computer’s hard drive, for data to be stored on, in simple terms. Different Operating Systems have their own partitions dedicated to themselves, such as Microsoft Windows having a partition for the main “C:” drive and another partition for its Microsoft Windows Recovery Environment to be stored on.
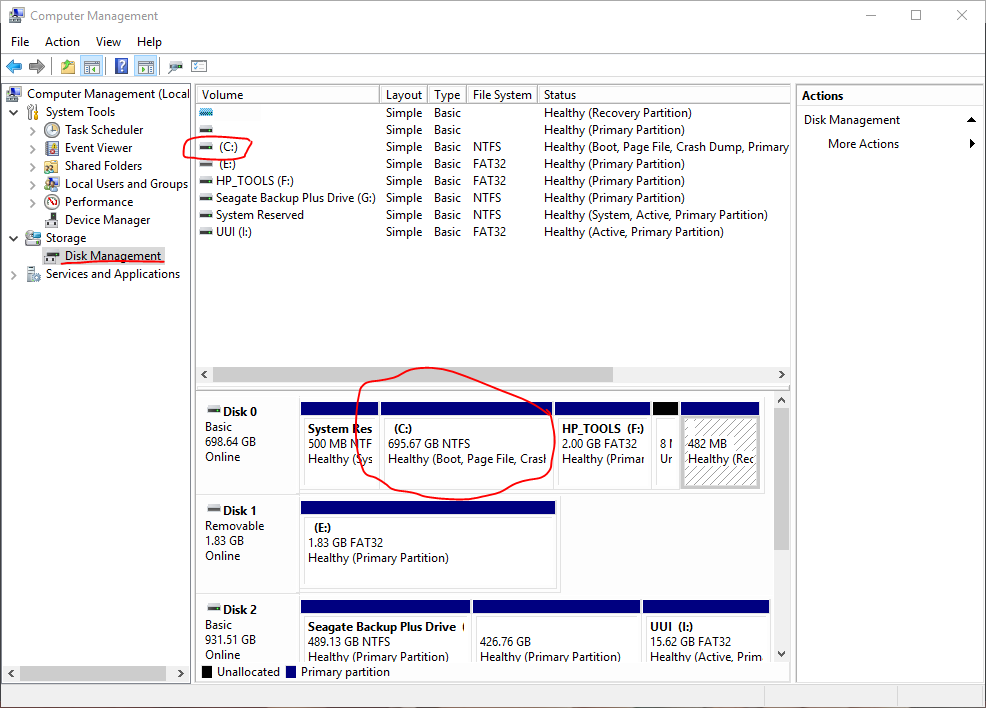
Right-click the Microsoft Windows partition in the blocks at the bottom of Disk Management, then click Shrink Volume on the menu that appears.
Now wait a few moments while Disk Management checks how far down the size of that partition can go. When finished, a dialog will appear - enter the amount of maximum disk space that you want Feren OS to have on your computer in the Enter the amount to shrink in MB textbox.
Hint
1GB = 1024MB - use the Calculator application to calculate your desired disk space properly.
Warning
Disk Management will cap the maximum size that you can shrink Microsoft Windows by based on factors such as available disk space. If the maximum is lower than your desired disk space for Feren OS, free up disk space and, if applicable, defragment the main Microsoft Windows partition to increase the maximum shrinkability.
Feren OS requires at least 20GB in disk space to be fully usable after being installed.
Now you have specified the amount to shrink the Microsoft Windows partition by, click Shrink. After a brief wait period, you should now see a new block, with black above it, to the right of the Microsoft Windows partition - if it says “Unallocated” you have successfully made free space to install Feren OS onto later - leave it as-is for now.
Turn off Fast Startup
Microsoft Windows 8 and onwards introduced and enabled a feature called Fast Startup by default. This feature makes your computer hibernate after some parts of Microsoft Windows have been terminated, rather than properly shutting down Windows, improving boot times.
However, this means that Windows never properly unmounts the C:\ drive, making it unsafe to mount in other Operating Systems and preventing it from being mounted for Transfer Tool to back up data from later.
Because of this, you will need to turn off Fast Startup in Windows before beginning the Feren OS installation process.
To turn off Fast Startup, do the following:
Open Start
Search for “Edit power plan” and open “Edit power plan” (in Microsoft Windows 10 and 11 this will also be indicated as a “Control panel” item)
In the address bar of the “Edit Plan Settings” window that appears click on Power Options (the bar at the top of the window)
On the left, there’ll be a bunch of options, click Choose what the power button does
Click Change settings that are currently unavailable and authenticate if required
Uncheck the Turn on fast start up (recommended) checkbox
Click Save changes
Once you’ve done that, you’ve successfully disabled Fast Startup.
Hint
If the option doesn’t exist, and you lack the Hibernate option when accessing the :guilabel:Power` menu, you can skip this step as your hardware is ineligible for Fast Startup.
Turn off Secure Boot
Hint
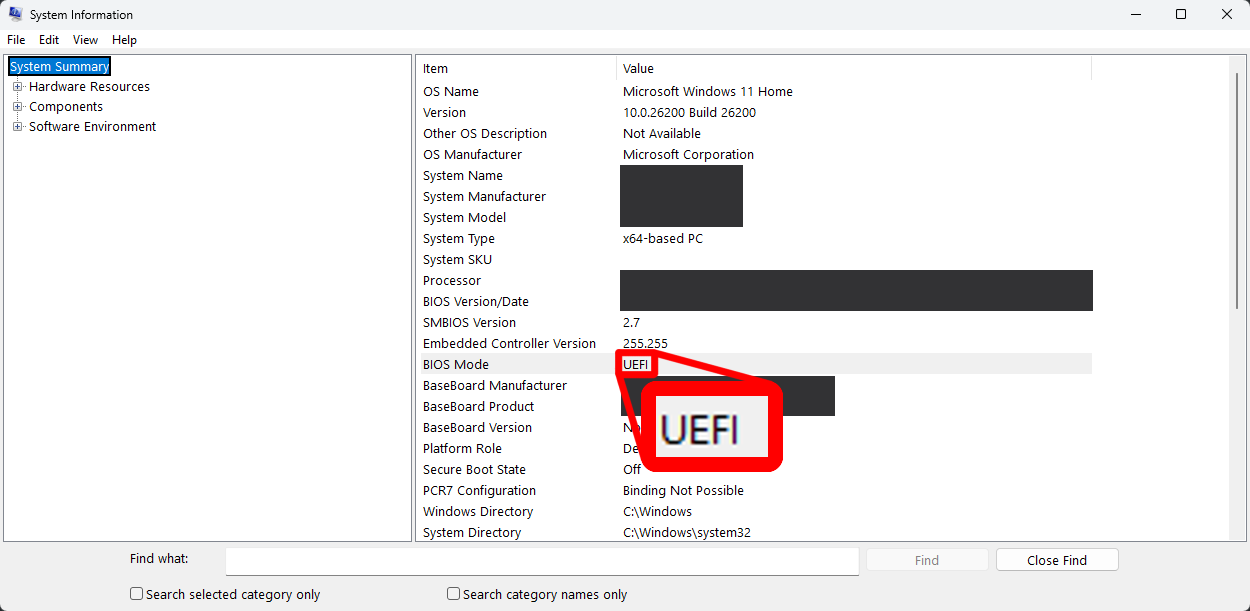
This section is only required for modern hardware that shipped with Microsoft Windows 8 or newer releases (denoted usually be the manufacturer’s logo displaying at the top of the screen instead of the Microsoft Windows logo when booting up). If you are unsure about your hardware using UEFI, open Start and this time search for “msinfo32” and, once listed, open System Information. If System Information states that your BIOS Mode is UEFI, continue.
Finally, you will want to turn off “Secure Boot” in your System Firmware settings.
You can boot into a Feren OS Live Session with Secure Boot turned on, however unless you disable it you cannot use certain drivers such as NVIDIA Hardware Drivers or Wireless Network Drivers for certain manufacturers such as Broadcom. You may also run into installation issues if it is turned on.
To turn off Secure Boot, you will first need to enter your System Firmware settings. There are different ways to enter System Firmware settings:
Warning
Firmware Settings should never be configured just because you can, unless you are an experienced computer user. If you take even one misstep you could lock yourself out of your computer or worse. If you’re unsure about disabling Secure Boot, ask a friend who has better experience with computers to help you with turning off Secure Boot.
On Microsoft Windows 8, 8.1, 10 and 11 go into Start -> Power -> (Hold Shift while clicking this option) Restart -> Troubleshoot -> Advanced options -> UEFI Firmware Settings -> Restart
On other machines you will want to find out, using the internet, which key to press to enter System Firmware Settings. You should search for “(your machine’s model here) enter BIOS settings” without the quotes in your favourite search engine to find out.
Warning
If you end up having to change the boot mode from “UEFI” or “EFI” to “CSM Boot” or “Legacy” to disable Secure Boot, you should have a USB or DVD flashed with your Feren OS ISO ready. If not, discard your changes, exit Firmware Settings and flash that ISO to a USB or DVD drive. If you do not do this, you will end up with “No Operating System found” errors until you undo your changes.
Now you are in the Firmware Settings screen, look around for a “Secure Boot” option. If you find an option for enabling Secure Boot then set it to be disabled.
Hint
At this point it is best to search the internet for a guide on disabling Secure Boot for your specific machine. This can be done by searching for “(your machine’s model name) disable secure boot” on the internet. If you find a guide, use that guide and disregard this one.
Once you have done that, go into the Exit tab and choose Save Changes and Exit or similar to save your changes and restart the computer.